
RESTCONF is a protocol defined by the IETF in RFC 8040 in 2017. According to it:
“This document describes an HTTP-based protocol that provides a programmatic interface for accessing data defined in YANG, using the datastore concepts defined in the Network Configuration Protocol(NETCONF)”
Cisco adopted this standard in IOS-XE, IOS-XR and NX-OS, so we can make use of this new programmable interfaces to make configurations or to monitor certain variables in our networking equipment.
However, even though there’s documentation both on DevNet and on the official IOS-XE configuration guide, getting started with some tests outside what’s specified on the examples of those guides can be a little confusing.
In this guide I try to explain a practical method to implement configurations that until now had been automated using CLI scripts. We’re going to use both standard and native YANG models, focusing on IOS-XE.
Tools needed
To work with RESTCONF, my tools are:
- Postman, to make HTTP requests to the boxes without having to write any script.
- Python3.6 with the “requests” library.
- Pyang, to explore YANG models
- A code editor, like Visual Studio Code for example.
- A lab with at least one device running IOS-XE. There are CSRv available on DevNet that can be used for this purpose.
RESTCONF
This guide is not intended to deep dive into RESTCONF nor YANG data models details. This information is available in the following DevNet modules:
https://developer.cisco.com/learning/tracks/iosxe-programmability
However, I do want to highlight some concepts:
- RESTCONF uses HTTPS as transport. This means that it implements GET, POST, PUT, DELETE, …, methods.
- Data Models are written in YANG. The data received in the response body is formatted in JSON.
- There are two types of YANG data models: open (IETF, IEEE) and natives (from Cisco, or any vendor).
In order to use RESTCONF, once this feature is enabled on a device, we first need to build the correct URI in which the resource we want to access is located. This URI will vary depending on the data model we use. It always follows the same structure:
https://<IP:Port>/<root>/data/<module:container>/<leaf>?<options>Where:
- <IP:Port> are the IP of the device and the port number that the RESTCONF services is attending (443 by default).
- <root> is the URI root, the same for every resource.
- <module:container> and <leaf> are the elements we are want to refer to inside the data module
- <options> are optional filters.
Once the URI is built, a request is made using some of the available methods, depending on what do we want to accomplish. The methods implemented in IOS-XE are the following:
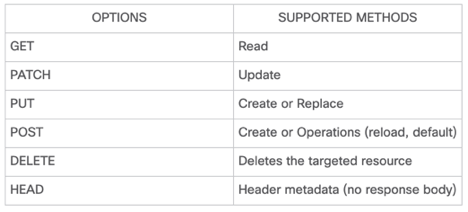
This guide’s aim is on how to properly build the URI, y which methods to use, in order to replicate well known CLI commands. And more specifically, how to get the values for: <root>, <module:container> and <leaf>.
Building the URI
As it was stated before, the URI is fundamentally build from following a YANG data model. The problem is that there are tons of YANG data models (both types, open and native) and that reading them is not precisely easy. They don’t follow any visible order neither, in order to allow someone without too much expertise using this data models to move around and learn. As a reference:
- Open models: https://github.com/YangModels/yang/tree/master/standard
- Native models (from Cisco, for example, sorted by OS type and version): https://github.com/YangModels/yang/tree/master/vendor/cisco
Besides, when I think of automating some tasks on a device, based on my knowledge and on the available documentation, is most likely that I have the information I need to make this configuration using the CLI. Therefore, one of the easiest ways of approaching this new interfaces is “converting” this IOS instructions into data and requests via RESTCONF.
Obtaining the root
RFC 8040 defines a specific URI to obtain this value:
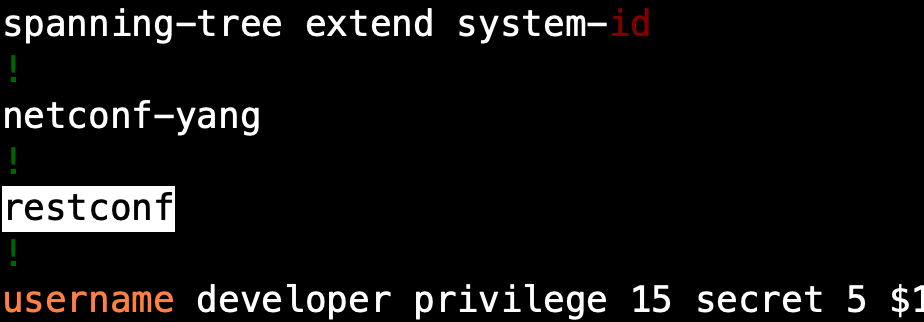
GET https://<direccion:puerto>/.well-known/host-metaThe value we are looking for is “restconf”, contained within the attribute “href” of the “Link” tag.
Obtaining module & container
The easiest way to explain the process I followed is using an example. What we are looking to automate is the configuration for a Spoke in a Hub & Spoke FlexVPN topology. If I wanted to configure the Spoke using the CLI, the basic commands that would at least have made the tunnel to go into an “Up” state would be:
Taking a look at the configuration, we see that is formed by six building blocks: keyring, IKEv2 auth policy, IKEv2 profile, IPSec profile, Loopback interfaces and Tunnel interface. This is the first step to find an equivalence: dividing the desired configuration into its building blocks. Each block will be a RESTCONF transaction.
Now, the first thing we need to continue building the URI is the YANG data model to use. Cisco provides a specific model, called “native” (Cisco-IOS-XE-native.yang), from which almost all the device configuration is available. This YANG model, for IOS-XE 16.9.3 for example, starts with the following lines:
We now have the module name: “Cisco-IOS-XE-native”. It is time to find the right container to use for making the configuration changes we want. If we analyze the “Cisco-IOS-XE-native” YANG data model with the Pyang tool we can see the following:
We can see that the whole tree depends on a single container that is also called “native”. This is the value we need.
To recap, the URI we have built so far is the following:
https://<IP:Port>/restconf/data/Cisco-IOS-XE-native:nativeThis URI can be used to get all the information from the container (equivalent of getting all the device configuration). In a reading operation, we could then filter the response using a simple script, but in order to make configuration changes we need the path to all the specific resources. Therefore, what remains is to find the path to the desired resource.
Obtaining the rest of the URI
At this point we need to change the method we are using to build the RESTCONF URI. Ideally, we are going to need a device running IOS-XE and with a factory default configuration. This way we are going to be able to detect exactly which CLI lines modify which within the data model. Using a CSRv is an easy way to go through this tests. In DevNet Sandbox, we can reserve an instance of a lab called “IOS XE on CSR Recommended Code” that has a CSRv that can be used for testing.
Using Postman we can make the requests needed in order to find the correct path. If using the CSRv on DevNet, and without making any change to the configuration, a GET request to the URI we’ve previously built returns the following:
Note: the response was filtered so it returns only the first level of the data structure for the sake of brevity. This can be done using “options” inside the URI. The “depth” option returns the result shown. The complete URI would be:
GET https://<IP:Port>/restconf/data/Cisco-IOS-XE-native:native?depth=1
We can see all the containers inside the “native” module. In this particular case, we know that at the moment of making changes using the CLI, the containers that will change are “interface” and “crypto”. In a case where you can not tell which container is going to be modified, you can execute a non-filtered request and look for changes in all the containers.
To see some changes, we need to configure something using the CLI. We are going to start with the Keyring. The following configuration lines are loaded:
Note: there is no need to save the configuration as RESTCONF calls take the data from the running-config.
Once the configuration is loaded we can make the request again using RESTCONF (GET) y the following changes are noticed inside the “crypto” container:
https://<IP:Port>/restconf/data/Cisco-IOS-XE-native:nativeThe response reflects the configuration we added to the device. Using this response we can complete the URI that would be needed to configure this Keyring using RESTCONF:
- The first thing is to determine what method is needed for the configuration: since we want to create a new Keyring, the appropriate method is POST,
- Complete the URI by reading the response structure: Keyring is defined inside “crypto” -> “ikev2” (the module name – before “:” – can be omitted).
- Define the message body: Inside the request body we will have to indicate all the parameters we want the Keyring to have when it is created. The body consists of all the data within the defined path. In this case would be the whole “keyring” field.
To recap, both the complete URI and the message body are shown below:
POST https://<IP:Port>/restconf/data/Cisco-IOS-XE-native:native/crypto/ikev2Once the request is built, it can be send to the device to find if it works correctly. The “status code” of the response will tell us if it worked or not:
| Code | Human description |
| 201 | Successfully created, is a correct response to a POST request. |
| 204 | Successfully modified, is a correct response to a PUT request. |
| 400 | There’s an error in the request, it happens when the URI is not the right one or if the message body has incorrect fields. |
| 401 | Credentials error. |
| 404 | Resource not found, Probably the URI is not the right one. |
| 409 | Creation conflict. If this comes as a result of a POST operation, it means that the resource already exists (and hence it should be modified using a PUT method). |
If the request is not working properly, then the URI or the message body have to be fixed using trial and error until you found the right one. Postman comes in really handy here.
In a second part of this post I will be uploading the remaining building blocks of this example.
Modifying Configurations
When we need to modify some part of the configuration that is already created, for example an interface, the type of request we need to build changes a little bit. We use the PUT method to modify or replace something in the configuration of a device, and generally we need to build a different URI to identify the specific resource we want to change.
How do we identify this resource? Inside a list, a specific resource can be identified as follows: let’s take as an example the Keyring created before, if we would like to modify it we can identify it by using its “name” key. In this case, the value of this key is “Flex_key”. The URI we need to use is the following:
PUT https://<IP:Port>/restconf/data/Cisco-IOS-XE-native:native/crypto/ikev2/keyring=Flex_keyWe should be aware that the whole content of the keyring is going to be replaced with the data inside the body of the request as a result of this operation. This means that all the fields that are not present inside the message body and existed previously in the configuration will be deleted. Therefore, is always recommended to make a GET request to that same URI and the use the response body to edit/modify/delete the desired fields in a subsequent PUT operation.
If the changes were successful, the status code on the response will be 204.
Here concludes the first post of this site! Any suggestions, questions, comments, let me know on the “Comments” section below, via email or Twitter.
Thank you so much for your useful blog.
Awesome post, very helpful as I try to figure out Restconf syntax in postman