
There is a lot of material regarding IOS-XE operation modes, but this content is really scattered on different webs. This is why I want to consolidate the most important aspects of IOS-XE switches operation modes in this single blog post. I will leave IOS-XE 3 versions out of the scope, as they have reached End of Life.
Catalyst switches running IOS-XE can execute the operating system in two different modes: bundle mode and install mode. This post aims to:
- Explain and compare both operation modes.
- Explain the software upgrade procedure for each operation mode.
- Describe the process of changing from one operation mode to another.
Note: For every example provided in this entry, I used a Catalyst 9300 switch.
Describing bundle mode
Bundle mode is the traditional operation mode in Cisco IOS. While using this mode, the software image that the switch runs consists in a single .bin file that is extracted and loaded at boot time.
To check if a device is running in bundle mode, we need to look at the BOOT system variable. We can check the BOOT variable by using the show boot Exec command. An alternative command to check the current operation mode is show version. The following example displays the output of these two commands on a switch that is running IOS-XE software in bundle mode:
Switch#show boot
---------------------------
Switch 1
---------------------------
Current Boot Variables:
BOOT variable = flash:cat9k_iosxe.16.12.08.SPA.bin;
Boot Variables on next reload:
BOOT variable = flash:cat9k_iosxe.16.12.08.SPA.bin;
Manual Boot = no
Enable Break = no
Boot Mode = DEVICE
iPXE Timeout = 0
Switch#show version | begin Mode
Switch Ports Model SW Version SW Image Mode
------ ----- ----- ---------- ---------- ----
* 1 65 C9300-48U 16.12.08 CAT9K_IOSXE BUNDLE
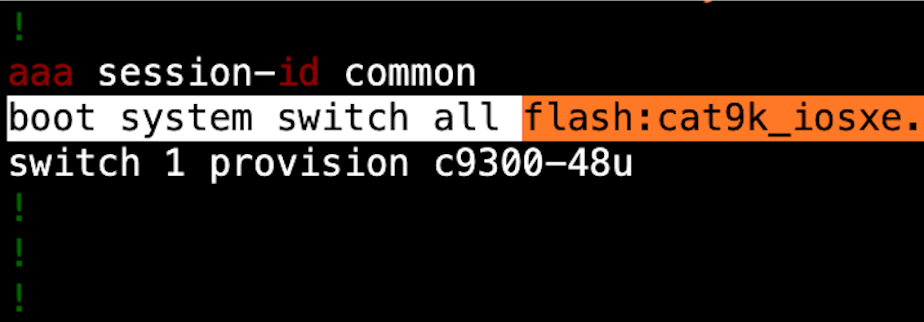
Configuration register is 0x102In bundle mode, the IOS-XE version that a switch is running can be modified using the boot system global configuration command. This will be further explained in the software upgrade section, but it is important to verify the presence of that command in the switch configuration. The following example shows how to perform this check:
Switch#show running-config | include boot system
boot system switch all flash:cat9k_iosxe.16.12.08.SPA.bin
Describing install mode
Install mode is the operation mode that Cisco recommends for IOS-XE switching platforms. In install mode, a switch uses the same software image .bin file that bundle mode uses. However, during the install process the switch extracts this .bin file into multiple .pkg. On boot time, the switch loads (and uses) the .pkg files. Not having to extract the .bin file content in every boot allows the switch to start faster.
In install mode, the BOOT system variable points to a specific file, no matter the IOS-XE version a switch is running. The name of this file is packages.conf. The following example shows the outputs of show boot and show version commands on a switch that is running in install mode:
Switch#show boot
---------------------------
Switch 1
---------------------------
Current Boot Variables:
BOOT variable does not exist

Boot Variables on next reload:
BOOT variable = flash:packages.conf;;
Manual Boot = no
Enable Break = no
Boot Mode = DEVICE
iPXE Timeout = 0
Switch#show version | begin Mode
Switch Ports Model              SW Version        SW Image              Mode
------ ----- -----              ----------        ----------            ----
*    1 65    C9300-48U          16.12.08          CAT9K_IOSXE           INSTALL


Configuration register is 0x102
The preceding example also shows that the “Current Boot Variable” does not exist. The switch configuration also shows this, as the running-config lacks a line with the boot system command:
Switch#show running-config | include boot system
Switch#
<El comando no devuelve ninguna línea>
Install mode does not need a boot system line in its configuration. The switch has the BOOT variable set to packages.conf if we perform every upgrade procedure using the provided commands (more about this commands in the software upgrades section). IOS-XE versions 16.12 and above provide the show romvar command. This command displays the BOOT variable stored in ROM. The following example shows the output of this command on a switch running IOS-XE in install mode:
Switch#show romvar
ROMMON variables:
 <Líneas omitidas>
 LICENSE_BOOT_LEVEL="network-advantage+dna-advantage,all:C9300_48P;"
 BAUD="9600"
 BOOT="flash:packages.conf;;"
 DC_COPY="yes"
 ABNORMAL_RESET_COUNT="0"
 SWITCH_IGNORE_STARTUP_CFG="0"
 <Líneas omitidas>
Note: the presence or absence of a boot system command in a switch’s running-config depends on the upgrade process a switch has been through.
We can look at the content of the packages.conf file. This file contains a list of .pkg files that the switch will load in memory at boot time. The following example show the content of the packages.conf file on the switch with IOS-XE 16.12.08 in install mode:
Switch#more flash:packages.conf
#! /usr/binos/bin/packages_conf.sh

sha1sum: ab2c00af9c9cbf807e1da9e2fd686a70e29254b6

# sha1sum above - used to verify that this file is not corrupted.

#
# package.conf: provisioned software file for build 2022-09-15_09.14
#

# NOTE: Editing this file by hand is not recommended. It is generated
#       as part of the build process, and is subject to boot-time
#       consistency checks. Automatically-produced package files are
#       guaranteed to pass those checks. Manually-maintained ones are
#       not. Because "nfs" and "mount" directives are processed first,
#       regardless of their position in the file, the recommended
#       approach is to keep a separate file containing JUST your
#       personal "nfs" and "mount" directives, and to append it to the
#       automatically-generated file.
#
#     Note further that when SHA-1 checksum verification is enabled,
#     you will NOT be able to alter this file without updating the
#     SHA-1 sum.

#
# This file can contain three types of entries:
#

#
# NFS directives (optional)
#     notes:    NFS directives are processed before all others (mount, iso).
#               Multiple NFS directives may appear so long as they do not
#               conflict -- that is, specify the same source or mountpoint.
#     syntax:   nfs <IP ADDRESS>:<REMOTE_PATH> <LOCAL_MOUNTPOINT>
#     example:  nfs 127.0.0.1:/auto/some/nfs/path /auto/some/nfs/path
#

#
# mount directives (optional)
#     notes:    mount directives are processed after 'nfs' and before 'iso'.
#               One mount directive may appear for each F/S/B/P tuple
#     syntax:   mount FRU SLOT BAY   PACKAGE_NAME   LINUX_PATH
#     example:  mount rp 0 0 rp_base /auto/some/nfs/path/abs_soft/rp_base.ppc
#
#               The specified LINUX_PATH may be local [sata disk] or
#               reference the NFS mounts since they are processed first.
#
#               Mount directives cause the package-specific mount link to
#               be set to the specified path instead of to the mountpoint
#               in sw for the corresponding ISO.
#

#
# iso directives (mandatory)
#     notes:    iso directives are processed last: any package for which
#               a 'mount' directive does not appear will be mounted.
#               One iso directive may appear for each F/S/B/P tuple.
#     syntax:   iso FRU SLOT BAY   PACKAGE_NAME  PACKAGE_FILE.bin
#     example:  iso rp 0 0 rp_base rp_base.ppc.bin
#
#               PACKAGE_FILE.bin is a path relative to the packages.conf
#               file.  Although it supports sub-directories for development
#               purposes, in deployment the files will always be managed
#               as in the same directory as packages.conf so as to
#               guarantee that name collisions cannot occur.
#
# Note that the RP 0/1 distinction is a convenience for development
# and testing as it allows us to have a packages.conf describe a
# SW load that varies depending on whether the RP finds itself in
# slot 0 or 1.
#
# The ISSU process *must* update *both* RP slots simultaneously so that
# the RP will behave predictably whichever slot it finds itself on [e.g.,
# if package X is upgraded, and the RP is ejected and put into either
# slot of a new chassis, we expect to see the upgraded X without regard
# to slot].
#

# This is for CAT9k
boot  rp 0 0   rp_boot         cat9k-rpboot.16.12.08.SPA.pkg
iso   rp 0 0   rp_base         cat9k-rpbase.16.12.08.SPA.pkg
iso   rp 0 0   rp_daemons      cat9k-rpbase.16.12.08.SPA.pkg
iso   rp 0 0   rp_iosd         cat9k-rpbase.16.12.08.SPA.pkg
iso   rp 0 0   rp_security     cat9k-rpbase.16.12.08.SPA.pkg
iso   rp 0 0   rp_wlc          cat9k-wlc.16.12.08.SPA.pkg
iso   rp 0 0   rp_webui        cat9k-webui.16.12.08.SPA.pkg
iso   rp 0 0   srdriver        cat9k-srdriver.16.12.08.SPA.pkg
iso   rp 0 0   guestshell      cat9k-guestshell.16.12.08.SPA.pkg

boot  rp 1 0   rp_boot         cat9k-rpboot.16.12.08.SPA.pkg
iso   rp 1 0   rp_base         cat9k-rpbase.16.12.08.SPA.pkg
iso   rp 1 0   rp_daemons      cat9k-rpbase.16.12.08.SPA.pkg
iso   rp 1 0   rp_iosd         cat9k-rpbase.16.12.08.SPA.pkg
iso   rp 1 0   rp_security     cat9k-rpbase.16.12.08.SPA.pkg
iso   rp 1 0   rp_wlc          cat9k-wlc.16.12.08.SPA.pkg
iso   rp 1 0   rp_webui        cat9k-webui.16.12.08.SPA.pkg
iso   rp 1 0   srdriver        cat9k-srdriver.16.12.08.SPA.pkg
iso   rp 1 0   guestshell      cat9k-guestshell.16.12.08.SPA.pkg

iso   fp 0 0   fp              cat9k-espbase.16.12.08.SPA.pkg
iso   fp 1 0   fp              cat9k-espbase.16.12.08.SPA.pkg

iso   cc 0 0   cc              cat9k-sipbase.16.12.08.SPA.pkg
iso   cc 1 0   cc              cat9k-sipbase.16.12.08.SPA.pkg
iso   cc 2 0   cc              cat9k-sipbase.16.12.08.SPA.pkg
iso   cc 3 0   cc              cat9k-sipbase.16.12.08.SPA.pkg
iso   cc 4 0   cc              cat9k-sipbase.16.12.08.SPA.pkg
iso   cc 5 0   cc              cat9k-sipbase.16.12.08.SPA.pkg
iso   cc 6 0   cc              cat9k-sipbase.16.12.08.SPA.pkg
iso   cc 7 0   cc              cat9k-sipbase.16.12.08.SPA.pkg
iso   cc 8 0   cc              cat9k-sipbase.16.12.08.SPA.pkg
iso   cc 9 0   cc              cat9k-sipbase.16.12.08.SPA.pkg
iso   cc 10 0  cc              cat9k-sipbase.16.12.08.SPA.pkg

iso   cc 0 0   cc_spa          cat9k-sipspa.16.12.08.SPA.pkg
iso   cc 1 0   cc_spa          cat9k-sipspa.16.12.08.SPA.pkg
iso   cc 2 0   cc_spa          cat9k-sipspa.16.12.08.SPA.pkg
iso   cc 3 0   cc_spa          cat9k-sipspa.16.12.08.SPA.pkg
iso   cc 4 0   cc_spa          cat9k-sipspa.16.12.08.SPA.pkg
iso   cc 5 0   cc_spa          cat9k-sipspa.16.12.08.SPA.pkg
iso   cc 6 0   cc_spa          cat9k-sipspa.16.12.08.SPA.pkg
iso   cc 7 0   cc_spa          cat9k-sipspa.16.12.08.SPA.pkg
iso   cc 8 0   cc_spa          cat9k-sipspa.16.12.08.SPA.pkg
iso   cc 9 0   cc_spa          cat9k-sipspa.16.12.08.SPA.pkg
iso   cc 10 0  cc_spa          cat9k-sipspa.16.12.08.SPA.pkg

iso   cc 0  0  cc_srdriver     cat9k-cc_srdriver.16.12.08.SPA.pkg
iso   cc 1  0  cc_srdriver     cat9k-cc_srdriver.16.12.08.SPA.pkg
iso   cc 2  0  cc_srdriver     cat9k-cc_srdriver.16.12.08.SPA.pkg
iso   cc 3  0  cc_srdriver     cat9k-cc_srdriver.16.12.08.SPA.pkg
iso   cc 4  0  cc_srdriver     cat9k-cc_srdriver.16.12.08.SPA.pkg
iso   cc 5  0  cc_srdriver     cat9k-cc_srdriver.16.12.08.SPA.pkg
iso   cc 6  0  cc_srdriver     cat9k-cc_srdriver.16.12.08.SPA.pkg
iso   cc 7  0  cc_srdriver     cat9k-cc_srdriver.16.12.08.SPA.pkg
iso   cc 8  0  cc_srdriver     cat9k-cc_srdriver.16.12.08.SPA.pkg
iso   cc 9  0  cc_srdriver     cat9k-cc_srdriver.16.12.08.SPA.pkg
iso   cc 10 0  cc_srdriver     cat9k-cc_srdriver.16.12.08.SPA.pkg

#
# -start- superpackage .pkginfo
#
# pkginfo: Name: rp_super
# pkginfo: BuildTime: 2022-09-15_09.14
# pkginfo: ReleaseDate: Thu-15-Sep-22-04:50
# pkginfo: .BuildArch: x86_64
# pkginfo: BootArchitecture: i686
# pkginfo: .BootArch: i686
# pkginfo: RouteProcessor: cat9k
# pkginfo: Platform: CAT9K
# pkginfo: User: mcpre
# pkginfo: PackageName: universalk9
# pkginfo: Build: 16.12.08
# pkginfo: .SupportedBoards: cat9k
# pkginfo: .InstallModel:
# pkginfo: .PackageRole: rp_super
# pkginfo: .RestartRole: rp_super
# pkginfo: .UnifiedPlatformList: passport,nyquist,starfleet
# pkginfo: CardTypes:
# pkginfo: .CardTypes:
# pkginfo: .BuildPath: /nobackup/mcpre/release/BLD-V16_12_08_FC1/binos/linkfarm/stage-cat9k/hard/rp_super_universalk9.x86_64
# pkginfo: .Version: 16.12.08.0.7211.1663258461..Gibraltar
# pkginfo: .InstallVersion: 1.0.0
# pkginfo: .InstallCapCommitSupport: yes
#
# -end- superpackage .pkginfo
#
The switch must have all the .pkg files present on its flash memory for the boot process to end successfully. The example below shows the files present on a switch:
Switch#show flash: | include \.pkg
 78   20022284 Oct 31 2022 23:50:01.0000000000 +00:00 cat9k-cc_srdriver.16.12.08.SPA.pkg
 79   89015304 Oct 31 2022 23:50:01.0000000000 +00:00 cat9k-espbase.16.12.08.SPA.pkg
 80    1684488 Oct 31 2022 23:50:01.0000000000 +00:00 cat9k-guestshell.16.12.08.SPA.pkg
 81  537015300 Oct 31 2022 23:50:01.0000000000 +00:00 cat9k-rpbase.16.12.08.SPA.pkg
 82   41774547 Oct 31 2022 23:50:27.0000000000 +00:00 cat9k-rpboot.16.12.08.SPA.pkg
 83   31294472 Oct 31 2022 23:50:01.0000000000 +00:00 cat9k-sipbase.16.12.08.SPA.pkg
 84   60204036 Oct 31 2022 23:50:02.0000000000 +00:00 cat9k-sipspa.16.12.08.SPA.pkg
 85   30827528 Oct 31 2022 23:50:02.0000000000 +00:00 cat9k-srdriver.16.12.08.SPA.pkg
 86   12923908 Oct 31 2022 23:50:02.0000000000 +00:00 cat9k-webui.16.12.08.SPA.pkg
 87       9220 Oct 31 2022 23:50:02.0000000000 +00:00 cat9k-wlc.16.12.08.SPA.pkg
The biggest differences in install mode is the software upgrade procedure. We will explore this procedure in the corresponding section of this post.
Software upgrades
This section explains the software upgrade procedures for bundle mode and install mode.
Note: before making any software upgrade, read carefully the corresponding IOS-XE version Release Notes and check if there is any change or limitation in the upgrade procedure.
Bundle mode software upgrade
Upgrading a switch in bundle mode is simple, but not as flexible as in install mode. The step-by-step process is:
- Copy the .bin file downloaded from Cisco to the device that you want to upgrade. You can transfer the file over the network (e.g. using TFTP, FTP, SCP, HTTP) or locally using an USB device. The following example shows a transfer using FTP:
Switch#copy ftp://<username>:<password>@<server-ip>/cat9k_iosxe.17.06.03.SPA.bin flash:
Destination filename [cat9k_iosxe.17.06.03.SPA.bin]?
Accessing ftp://*:*@<server-ip>/cat9k_iosxe.17.06.03.SPA.bin...!!!!!!!!!!!!!!!!!!!!!!!!!!!!!!!!!!!!!!!!!!!!!!!!!!!!!!!!!!!!!!!!!!!!!!!!!!!!!!!!!!!!!!!!!!!!!!!!!!!!!!!!!!!!!!!!!!!!!!!!!!!!!!!!!!!!!!!!!!!!!!!!!!!!!!!!!!!!!!<Omitido>!!!!!!!!!
[OK - 1017259730/4096 bytes]- Check the file integrity comparing the MD5 hash that Cisco provides.
Switch#verify /md5 flash:cat9k_iosxe.17.06.03.SPA.bin 4637c5c6767fee76c8b0cec1b7370cd3
..........................................................................................
..........................................................................................
..........................................................................................
..........................................................................................
................................<Omitido>............................................Done!
Verified (flash:cat9k_iosxe.17.06.03.SPA.bin) = 4637c5c6767fee76c8b0cec1b7370cd3- Use the
boot systemcommand in the switch’s global configuration mode to indicate. By doing this, the switch will use the new image in the next boot.
Switch#configure terminal
Switch(config)#boot system flash:cat9k_iosxe.17.06.03.SPA.bin- Remove the
boot systemcommand that points to the old IOS-XE imagen (the one that the switch is actually running). Use thenokeyword to remove the line.
Switch(config)#no boot system flash:cat9k_iosxe.16.12.08.SPA.bin- Verify the
running-configand check that it contains the correctboot systemcommand. The correct command is the one configured on step 3. Save the configuration after checking.
Switch#show running-config | include boot system
boot system switch all flash:cat9k_iosxe.17.06.03.SPA.bin
Switch#write
Building configuration...
[OK]- Reboot the switch. Wait until the switch finishes its boot process, The switch should be running the new IOS-XE version.
With these steps done, the switch is already upgraded. You can delete from the flash the previous version’s .bin file for to free up some space from the flash memory.
Install mode software upgrade
IOS-XE 16 introduced the install command on install mode. We use this command to perform software upgrades. Using install mode provides some functionalities that are not present in bundle mode:
- If upgrading a stack of switches, the
installcommand will sync the new image in every stack member. - Install mode supports rollback in a situation where a switch loses remote management after a software upgrade.
installcommand provides a way of cleaning the flash memory for unused files in a secure way.
The software upgrade procedure has three main steps:
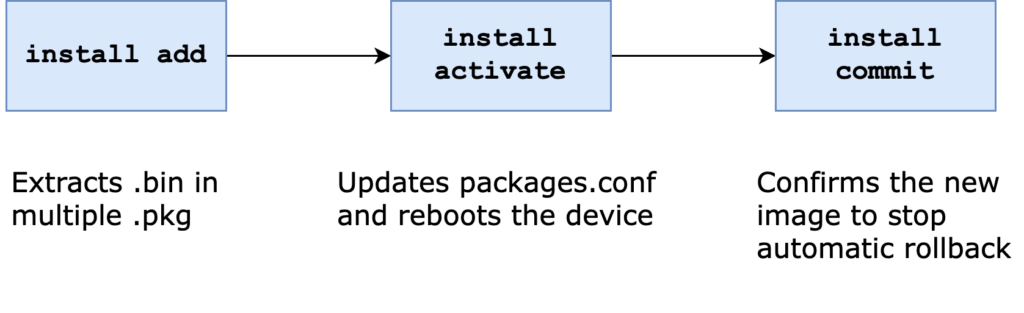
- Install add: Extracts the .bin image and obtains the multiple .pkg files.
- Install activate: Rewrites the packages.conf file with the information corresponding to the new software image, then reboots the switch.
- Install commit: Once the reboot process is over, this command disables the automatic rollback timer.
You can execute the three main steps independently, or execute them using a single command. If you use the single command approach, then you will loose the rollback capability. However, upgrade procedure looks more similar to the procedure used in bundle mode, allowing you to adapt scripts more easily.
This guide shows the step-by-step upgrade procedure using independent commands for each main upgrade step, so we can see the rollback capability. The steps required to make a software upgrade in install mode are the following:
- Copy the .bin file downloaded from Cisco to the device that you want to upgrade. You can transfer the file over the network (e.g. using TFTP, FTP, SCP, HTTP) or locally using an USB device. The following example shows a transfer using FTP:
Switch#copy ftp://<username>:<password>@<server-ip>/cat9k_iosxe.17.06.03.SPA.bin flash:
Destination filename [cat9k_iosxe.17.06.03.SPA.bin]?
Accessing ftp://*:*@<server-ip>/cat9k_iosxe.17.06.03.SPA.bin...!!!!!!!!!!!!!!!!!!!!!!!!!!!!!!!!!!!!!!!!!!!!!!!!!!!!!!!!!!!!!!!!!!!!!!!!!!!!!!!!!!!!!!!!!!!!!!!!!!!!!!!!!!!!!!!!!!!!!!!!!!!!!!!!!!!!!!!!!!!!!!!!!!!!!!!!!!!!!!<Omitido>!!!!!!!!!
[OK - 1017259730/4096 bytes]- Check the file integrity comparing the MD5 hash that Cisco provides.
Switch#verify /md5 flash:cat9k_iosxe.17.06.03.SPA.bin 4637c5c6767fee76c8b0cec1b7370cd3
..........................................................................................
..........................................................................................
..........................................................................................
..........................................................................................
................................<Omitido>............................................Done!
Verified (flash:cat9k_iosxe.17.06.03.SPA.bin) = 4637c5c6767fee76c8b0cec1b7370cd3- Run the
install addcommand indicating the .bin file. This will add the new image to the switch. Verify that the new image was added using theshow install summarycommand.
The new image is inactive, and requires a manual activation for the switch to start using this image.
Switch#install add file flash:cat9k_iosxe.17.06.03.SPA.bin
install_add: START Tue Nov  1 18:04:24 UTC 2022
install_add: Adding PACKAGE
install_add: Checking whether new add is allowed ....

--- Starting initial file syncing ---
Info: Finished copying flash:cat9k_iosxe.17.06.03.SPA.bin to the selected switch(es)
Finished initial file syncing

--- Starting Add ---
Performing Add on all members
  [1] Add package(s) on switch 1
  [1] Finished Add on switch 1
Checking status of Add on [1]
Add: Passed on [1]
Finished Add

Image added. Version: 17.06.03.0.3629
SUCCESS: install_add  Tue Nov  1 18:07:14 UTC 2022
Switch#show install summary
[ Switch 1 ] Installed Package(s) Information:
State (St): I - Inactive, U - Activated & Uncommitted,
            C - Activated & Committed, D - Deactivated & Uncommitted
--------------------------------------------------------------------------------
Type  St   Filename/Version
--------------------------------------------------------------------------------
IMG   I    17.06.03.0.3629
IMG   C    16.12.08.0.7211

--------------------------------------------------------------------------------
Auto abort timer: inactive
--------------------------------------------------------------------------------- Activate the new image with the
install activatecommand. This command reboots the switch once finished.
Note: If you want to perform this process using scripting, you can add theprompt-level nonekeywords at the end of theinstall activatecommand. This disables interactive confirmation.
Switch#install activate
install_activate: START Tue Nov  1 18:38:57 UTC 2022
install_activate: Activating PACKAGE
Following packages shall be activated:
/flash/cat9k-wlc.17.06.03.SPA.pkg
/flash/cat9k-webui.17.06.03.SPA.pkg
/flash/cat9k-srdriver.17.06.03.SPA.pkg
/flash/cat9k-sipspa.17.06.03.SPA.pkg
/flash/cat9k-sipbase.17.06.03.SPA.pkg
/flash/cat9k-rpboot.17.06.03.SPA.pkg
/flash/cat9k-rpbase.17.06.03.SPA.pkg
/flash/cat9k-lni.17.06.03.SPA.pkg
/flash/cat9k-guestshell.17.06.03.SPA.pkg
/flash/cat9k-espbase.17.06.03.SPA.pkg
/flash/cat9k-cc_srdriver.17.06.03.SPA.pkg

This operation may require a reload of the system. Do you want to proceed? [y/n]y
--- Starting Activate ---
Performing Activate on all members
  [1] Activate package(s) on switch 1
    --- Starting list of software package changes ---
    Old files list:
      Removed cat9k-cc_srdriver.16.12.08.SPA.pkg
      Removed cat9k-espbase.16.12.08.SPA.pkg
      Removed cat9k-guestshell.16.12.08.SPA.pkg
      Removed cat9k-rpbase.16.12.08.SPA.pkg
      Removed cat9k-rpboot.16.12.08.SPA.pkg
      Removed cat9k-sipbase.16.12.08.SPA.pkg
      Removed cat9k-sipspa.16.12.08.SPA.pkg
      Removed cat9k-srdriver.16.12.08.SPA.pkg
      Removed cat9k-webui.16.12.08.SPA.pkg
      Removed cat9k-wlc.16.12.08.SPA.pkg
    New files list:
      Added cat9k-cc_srdriver.17.06.03.SPA.pkg
      Added cat9k-espbase.17.06.03.SPA.pkg
      Added cat9k-guestshell.17.06.03.SPA.pkg
      Added cat9k-lni.17.06.03.SPA.pkg
      Added cat9k-rpbase.17.06.03.SPA.pkg
      Added cat9k-rpboot.17.06.03.SPA.pkg
      Added cat9k-sipbase.17.06.03.SPA.pkg
      Added cat9k-sipspa.17.06.03.SPA.pkg
      Added cat9k-srdriver.17.06.03.SPA.pkg
      Added cat9k-webui.17.06.03.SPA.pkg
      Added cat9k-wlc.17.06.03.SPA.pkg
    Finished list of software package changes
  [1] Finished Activate on switch 1
Checking status of Activate on [1]
Activate: Passed on [1]
Finished Activate

[1]: Performing Upgrade_Service
300+0 records in
300+0 records out
307200 bytes (307 kB, 300 KiB) copied, 0.31935 s, 962 kB/s
16128+0 records in
16128+0 records out
8257536 bytes (8.3 MB, 7.9 MiB) copied, 8.58064 s, 962 kB/s
  SUCCESS: Upgrade_Service finished
Install will reload the system now!
SUCCESS: install_activate Tue Nov 1 18:52:42 UTC 2022- Wait until the switch reboots. Then, check the IOS-XE version that is running on the switch using the
show install summarycommand. The actual IOS-XE image appears as uncommitted. To confirm that the upgrade process succeeded, use theinstall commit. This confirmation makes image upgrade permanent.
Note: by default, the upgrade process activates a 120 minutes timer after the image activation on step 4. Not entering install commit before this timeframe triggers automatic rollback. If rollback happens, the switch reverts back to the IOS-XE that was using previously. The upgrade procedure in this case must be performed again from step 1.
Switch#show install summary
[ Switch 1 ] Installed Package(s) Information:
State (St): I - Inactive, U - Activated & Uncommitted,
            C - Activated & Committed, D - Deactivated & Uncommitted
--------------------------------------------------------------------------------
Type  St   Filename/Version
--------------------------------------------------------------------------------
IMG   U    17.06.03.0.3629

--------------------------------------------------------------------------------
Auto abort timer: active , time before rollback - 01:39:37
--------------------------------------------------------------------------------


Switch#install commit
install_commit: START Tue Nov  1 23:08:34 UTC 2022
install_commit: Committing PACKAGE

--- Starting Commit ---
Performing Commit on all members
  [1] Commit package(s) on switch 1
  [1] Finished Commit on switch 1
Checking status of Commit on [1]
Commit: Passed on [1]
Finished Commit

SUCCESS: install_commit  Tue Nov  1 23:08:37 UTC 2022
Switch#show install summary
[ Switch 1 ] Installed Package(s) Information:
State (St): I - Inactive, U - Activated & Uncommitted,
            C - Activated & Committed, D - Deactivated & Uncommitted
--------------------------------------------------------------------------------
Type  St   Filename/Version
--------------------------------------------------------------------------------
IMG   C    17.06.03.0.3629

--------------------------------------------------------------------------------
Auto abort timer: inactive
--------------------------------------------------------------------------------- Clean the unused files (from the previous IOS-XE image). Run the
install remove inactivecommand on the switch to start the cleanup process. Using this commands prevents an accidental removal of any file that the switch still needs.
Note: if you look carefully, you will see this process will also delete the .bin file of the new IOS-XE image. This file is deleted because, once extracted, is no longer needed.
Switch#install remove inactive
install_remove: START Tue Nov  1 23:11:07 UTC 2022
Cleaning up unnecessary package files
No path specified, will use booted path flash:packages.conf
Cleaning flash:
  Scanning boot directory for packages ... done.
  Preparing packages list to delete ...
    cat9k-cc_srdriver.17.06.03.SPA.pkg
      File is in use, will not delete.
    cat9k-espbase.17.06.03.SPA.pkg
      File is in use, will not delete.
    cat9k-guestshell.17.06.03.SPA.pkg
      File is in use, will not delete.
    cat9k-lni.17.06.03.SPA.pkg
      File is in use, will not delete.
    cat9k-rpbase.17.06.03.SPA.pkg
      File is in use, will not delete.
    cat9k-rpboot.17.06.03.SPA.pkg
      File is in use, will not delete.
    cat9k-sipbase.17.06.03.SPA.pkg
      File is in use, will not delete.
    cat9k-sipspa.17.06.03.SPA.pkg
      File is in use, will not delete.
    cat9k-srdriver.17.06.03.SPA.pkg
      File is in use, will not delete.
    cat9k-webui.17.06.03.SPA.pkg
      File is in use, will not delete.
    cat9k-wlc.17.06.03.SPA.pkg
      File is in use, will not delete.
    packages.conf
      File is in use, will not delete.
  done.

The following files will be deleted:
[switch 1]:
/flash/cat9k-cc_srdriver.16.12.08.SPA.pkg
/flash/cat9k-espbase.16.12.08.SPA.pkg
/flash/cat9k-guestshell.16.12.08.SPA.pkg
/flash/cat9k-rpbase.16.12.08.SPA.pkg
/flash/cat9k-rpboot.16.12.08.SPA.pkg
/flash/cat9k-sipbase.16.12.08.SPA.pkg
/flash/cat9k-sipspa.16.12.08.SPA.pkg
/flash/cat9k-srdriver.16.12.08.SPA.pkg
/flash/cat9k-webui.16.12.08.SPA.pkg
/flash/cat9k-wlc.16.12.08.SPA.pkg
/flash/cat9k_iosxe.17.06.03.SPA.1.conf
/flash/cat9k_iosxe.17.06.03.SPA.bin
/flash/cat9k_iosxe.17.06.03.SPA.conf

Do you want to remove the above files? [y/n]y
[switch 1]:
Deleting file flash:cat9k-cc_srdriver.16.12.08.SPA.pkg ... done.
Deleting file flash:cat9k-espbase.16.12.08.SPA.pkg ... done.
Deleting file flash:cat9k-guestshell.16.12.08.SPA.pkg ... done.
Deleting file flash:cat9k-rpbase.16.12.08.SPA.pkg ... done.
Deleting file flash:cat9k-rpboot.16.12.08.SPA.pkg ... done.
Deleting file flash:cat9k-sipbase.16.12.08.SPA.pkg ... done.
Deleting file flash:cat9k-sipspa.16.12.08.SPA.pkg ... done.
Deleting file flash:cat9k-srdriver.16.12.08.SPA.pkg ... done.
Deleting file flash:cat9k-webui.16.12.08.SPA.pkg ... done.
Deleting file flash:cat9k-wlc.16.12.08.SPA.pkg ... done.
Deleting file flash:cat9k_iosxe.17.06.03.SPA.1.conf ... done.
Deleting file flash:cat9k_iosxe.17.06.03.SPA.bin ... done.
Deleting file flash:cat9k_iosxe.17.06.03.SPA.conf ... done.
SUCCESS: Files deleted.
--- Starting Post_Remove_Cleanup ---
Performing Post_Remove_Cleanup on all members
  [1] Post_Remove_Cleanup package(s) on switch 1
  [1] Finished Post_Remove_Cleanup on switch 1
Checking status of Post_Remove_Cleanup on [1]
Post_Remove_Cleanup: Passed on [1]
Finished Post_Remove_Cleanup

SUCCESS: install_remove  Tue Nov  1 23:16:39 UTC 2022
The upgrade process concludes after these steps. Remember that IOS-XE also supports a single command upgrade for install mode, as mentioned before.
install command is available through YANG models on IOS-XE versions 17.3 and above. You can learn more about these models checking one of my other blog posts: “RESTCONF: Operations”.
Switching between operation modes
This last section explains how to change a switch operation mode. Note that both processes, while simple, require a device reboot for the affected switches.
From bundle mode to Install mode
To change the operation mode from bundle mode to install mode, the process required is equivalent to an install mode single command upgrade procedure. Perform the following steps:
- You can reuse the .bin file that the switch is currently running. A software upgrade is not required. Use the
installcommand with this file. The switch reboots after this process is finished.
Switch#install add file flash:cat9k_iosxe.17.06.03.SPA.bin activate commit
install_add_activate_commit: START Wed Nov  2 23:15:09 UTC 2022
install_add_activate_commit: Adding PACKAGE
install_add_activate_commit: Checking whether new add is allowed ....

--- Starting initial file syncing ---
Info: Finished copying flash:cat9k_iosxe.17.06.03.SPA.bin to the selected switch(es)
Finished initial file syncing

--- Starting Add ---
Performing Add on all members
  [1] Add package(s) on switch 1
  [1] Finished Add on switch 1
Checking status of Add on [1]
Add: Passed on [1]
Finished Add

Image added. Version: 17.06.03.0.3629
install_add_activate_commit: Activating PACKAGE
Following packages shall be activated:
/flash/cat9k-wlc.17.06.03.SPA.pkg
/flash/cat9k-webui.17.06.03.SPA.pkg
/flash/cat9k-srdriver.17.06.03.SPA.pkg
/flash/cat9k-sipspa.17.06.03.SPA.pkg
/flash/cat9k-sipbase.17.06.03.SPA.pkg
/flash/cat9k-rpboot.17.06.03.SPA.pkg
/flash/cat9k-rpbase.17.06.03.SPA.pkg
/flash/cat9k-lni.17.06.03.SPA.pkg
/flash/cat9k-guestshell.17.06.03.SPA.pkg
/flash/cat9k-espbase.17.06.03.SPA.pkg
/flash/cat9k-cc_srdriver.17.06.03.SPA.pkg

This operation may require a reload of the system. Do you want to proceed? [y/n]y
--- Starting Activate ---
Performing Activate on all members
  [1] Activate package(s) on switch 1
  [1] Finished Activate on switch 1
Checking status of Activate on [1]
Activate: Passed on [1]
Finished Activate

--- Starting Commit ---
Performing Commit on all members
  [1] Commit package(s) on switch 1
  [1] Finished Commit on switch 1
Checking status of Commit on [1]
Commit: Passed on [1]
Finished Commit

Send model notification for install_add_activate_commit before reload
[1]: Performing Upgrade_Service
300+0 records in
300+0 records out
307200 bytes (307 kB, 300 KiB) copied, 0.195346 s, 1.6 MB/s
mount: /tmp/microcode_update/boot_pkg: WARNING: device write-protected, mounted read-only.
  SUCCESS: Upgrade_Service finished
Install will reload the system now!
SUCCESS: install_add_activate_commit Wed Nov 2 23:25:33 UTC 2022- Once the switch reboots, verify the new operation mode.
Switch#show boot
---------------------------
Switch 1
---------------------------
Current Boot Variables:
BOOT variable = flash:packages.conf;

Boot Variables on next reload:
BOOT variable = flash:packages.conf;
Manual Boot = no
Enable Break = no
Boot Mode = DEVICE
iPXE Timeout = 0
Switch#show version | begin Mode
Switch Ports Model              SW Version        SW Image              Mode
------ ----- -----              ----------        ----------            ----
* 1 65 C9300-48U 17.06.03 CAT9K_IOSXE INSTALL- Clean the flash using the
install remove inactivecommand.
Switch#install remove inactive
install_remove: START Wed Nov  2 23:40:02 UTC 2022
Cleaning up unnecessary package files
No path specified, will use booted path flash:packages.conf
Cleaning flash:
  Scanning boot directory for packages ... done.
  Preparing packages list to delete ...
    cat9k-cc_srdriver.17.06.03.SPA.pkg
      File is in use, will not delete.
    cat9k-espbase.17.06.03.SPA.pkg
      File is in use, will not delete.
    cat9k-guestshell.17.06.03.SPA.pkg
      File is in use, will not delete.
    cat9k-lni.17.06.03.SPA.pkg
      File is in use, will not delete.
    cat9k-rpbase.17.06.03.SPA.pkg
      File is in use, will not delete.
    cat9k-rpboot.17.06.03.SPA.pkg
      File is in use, will not delete.
    cat9k-sipbase.17.06.03.SPA.pkg
      File is in use, will not delete.
    cat9k-sipspa.17.06.03.SPA.pkg
      File is in use, will not delete.
    cat9k-srdriver.17.06.03.SPA.pkg
      File is in use, will not delete.
    cat9k-webui.17.06.03.SPA.pkg
      File is in use, will not delete.
    cat9k-wlc.17.06.03.SPA.pkg
      File is in use, will not delete.
    packages.conf
      File is in use, will not delete.
  done.

The following files will be deleted:
[switch 1]:
/flash/cat9k_iosxe.17.06.03.SPA.bin

Do you want to remove the above files? [y/n]y
[switch 1]:
Deleting file flash:cat9k_iosxe.17.06.03.SPA.bin ... done.
SUCCESS: Files deleted.
--- Starting Post_Remove_Cleanup ---
Performing Post_Remove_Cleanup on all members
  [1] Post_Remove_Cleanup package(s) on switch 1
  [1] Finished Post_Remove_Cleanup on switch 1
Checking status of Post_Remove_Cleanup on [1]
Post_Remove_Cleanup: Passed on [1]
Finished Post_Remove_Cleanup

SUCCESS: install_remove  Wed Nov  2 23:51:08 UTC 2022
Note: If you tried to perform an operation mode change using the three-step install commands, the switch throws the following error:
Switch#install add file flash:cat9k_iosxe.17.06.03.SPA.bin
install_add: START Wed Nov  2 23:10:34 UTC 2022
install_add: Adding PACKAGE
install_add: Checking whether new add is allowed ....
ERROR: install_add: Booted in bundle mode. For Bundle-to-Install mode conversion, please use one-shot CLI - install add file <> activate commit
FAILED: install_add  exit(1) Wed Nov  2 23:11:29 UTC 2022
From install mode to bundle mode
To change the operation mode from install mode to bundle mode, the process required is equivalent to a bundle mode upgrade procedure.
Note: If the switch’s flash was cleaned after an upgrade process, the .bin file for the IOS-XE image that is currently running may not be available. If such is the case, you need copy the .bin file again to the switch.
Perform the following steps to change from bundle mode to install mode:
- Copy the .bin file downloaded from Cisco to the device that you want to upgrade. You can transfer the file over the network (e.g. using TFTP, FTP, SCP, HTTP) or locally using an USB device. The following example shows a transfer using FTP:
Switch#copy ftp://<username>:<password>@<server-ip>/cat9k_iosxe.17.06.03.SPA.bin flash:
Destination filename [cat9k_iosxe.17.06.03.SPA.bin]?
Accessing ftp://*:*@<server-ip>/cat9k_iosxe.17.06.03.SPA.bin...!!!!!!!!!!!!!!!!!!!!!!!!!!!!!!!!!!!!!!!!!!!!!!!!!!!!!!!!!!!!!!!!!!!!!!!!!!!!!!!!!!!!!!!!!!!!!!!!!!!!!!!!!!!!!!!!!!!!!!!!!!!!!!!!!!!!!!!!!!!!!!!!!!!!!!!!!!!!!!<Omitido>!!!!!!!!!
[OK - 1017259730/4096 bytes]- Check the file integrity comparing the MD5 hash that Cisco provides.
Switch#verify /md5 flash:cat9k_iosxe.17.06.03.SPA.bin 4637c5c6767fee76c8b0cec1b7370cd3
..........................................................................................
..........................................................................................
..........................................................................................
..........................................................................................
................................<Omitido>............................................Done!
Verified (flash:cat9k_iosxe.17.06.03.SPA.bin) = 4637c5c6767fee76c8b0cec1b7370cd3- Delete any previous
bootcommand.
Switch#conf t
Enter configuration commands, one per line.  End with CNTL/Z.
Switch(config)#no boot system- Add a new
bootcommand pointing to the .bin file that was transferred on step 1. Save the configuration.
Switch(config)#boot system flash:cat9k_iosxe.17.06.03.SPA.bin
Switch(config)#end
Switch#write
Building configuration...
[OK]- Check the BOOT system variable, and reboot the switch.
Switch#show boot
---------------------------
Switch 1
---------------------------
Current Boot Variables:
BOOT variable = flash:cat9k_iosxe.17.06.03.SPA.bin;

Boot Variables on next reload:
BOOT variable = flash:cat9k_iosxe.17.06.03.SPA.bin;
Manual Boot = no
Enable Break = no
Boot Mode = DEVICE
iPXE Timeout = 0
Switch#reload
Reload command is being issued on Active unit, this will reload the whole stack
Proceed with reload? [confirm]- Once the switch reboots, verify the new operation mode.
Switch#show version | begin Mode
Switch Ports Model              SW Version        SW Image              Mode
------ ----- -----              ----------        ----------            ----
*    1 65    C9300-48U          17.06.03          CAT9K_IOSXE           BUNDLE
All the procedures that I wanted to show you conclude here. I hope this post has been useful, and remember that comments are open if you have any question.
Thank you! you just solved an issue I was having. Awesome article
Glad that the post was useful!
Clear, precise. Your instruction and explanation complements the Cisco doc on this topic.
Please keep up the great work.
Very cool! Appreciate the explanation.