
Hay mucho material disperso en Internet sobre los modos de operación de los switches Cisco con IOS-XE. Dejando de lado las versiones de IOS-XE 3, ya sin soporte, voy a intentar consolidar los aspectos más importante de este tema en esta única entrada del blog.
Los equipos Catalyst que ejecutan IOS-XE pueden correr el sistema operativo en dos modos de operación diferentes: Bundle mode e Install mode. En este post se busca lo siguiente:
- Explicar y comparar ambos modos de operación.
- Explicar los procesos de actualización de software en ambo modos de operación.
- Documentar los pasos para pasar de un modo de operación a otro.
Para ejemplificar todo el contenido que viene a continuación, se usó un switch Catalyst 9300.
Descripción de Bundle mode
Bundle mode es el modo de operación tradicional de Cisco IOS. En este modo la imagen de software es un único archivo .bin que el equipo extrae y ejecuta al momento de iniciar.
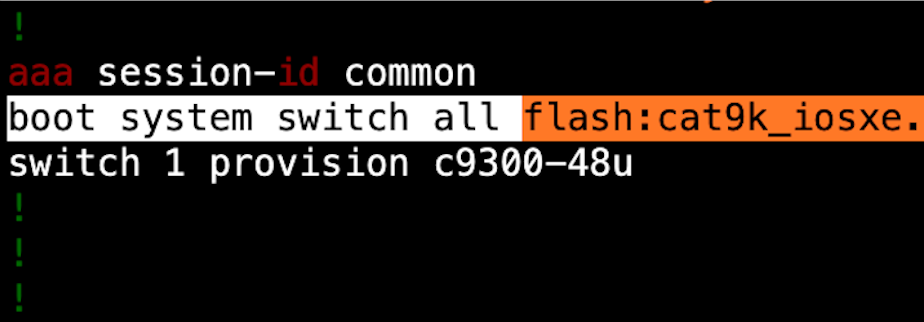
Para saber si un equipo se encuentra en bundle mode, se debe chequear la variable BOOT del sistema. Esto se hace usando el comando show boot en el modo Exec. También puede verse de forma más clara en el comando show version. En el ejemplo debajo, el switch está ejecutando IOS-XE en bundle mode.
Switch#show boot
---------------------------
Switch 1
---------------------------
Current Boot Variables:
BOOT variable = flash:cat9k_iosxe.16.12.08.SPA.bin;

Boot Variables on next reload:
BOOT variable = flash:cat9k_iosxe.16.12.08.SPA.bin;
Manual Boot = no
Enable Break = no
Boot Mode = DEVICE
iPXE Timeout = 0
Switch#show version | begin Mode
Switch Ports Model              SW Version        SW Image              Mode
------ ----- -----              ----------        ----------            ----
*    1 65    C9300-48U          16.12.08          CAT9K_IOSXE           BUNDLE


Configuration register is 0x102
En bundle mode, para modificar la versión de IOS-XE a ejecutar, se debe usar el comando boot system en el modo de configuración global. Esto se verá más adelante, en la sección dedicada a la actualización de software. Por ahora, solo resta revisar la configuración del switch para verificar que se encuentra el comando con la imagen de IOS-XE que actualmente se ejecuta en el equipo.
Switch#show running-config | include boot system
boot system switch all flash:cat9k_iosxe.16.12.08.SPA.bin
Descripción de Install mode
Install mode es el recomendado por Cisco para estas plataformas. En este caso, la imagen de software desde la que se parte es el archivo .bin que también se utiliza en bundle mode. Sin embargo, durante el proceso de instalación este archivo se extrae en múltiples archivos .pkg que son los que se utilizarán y cargaran en memoria cuando el switch esté iniciando. Al no tener que realizar la descompresión, el switch inicia más rápido.
La variable BOOT del sistema ahora apunta a un mismo archivo independientemente de la versión de IOS-XE que se esté ejecutando: packages.conf. Se puede comprobar el valor de la variable BOOT al igual que en bundle mode: con el comando show boot o con el comando show version. En el ejemplo siguiente el equipo está en install mode:
Switch#show boot
---------------------------
Switch 1
---------------------------
Current Boot Variables:
BOOT variable does not exist

Boot Variables on next reload:
BOOT variable = flash:packages.conf;;
Manual Boot = no
Enable Break = no
Boot Mode = DEVICE
iPXE Timeout = 0
Switch#show version | begin Mode
Switch Ports Model              SW Version        SW Image              Mode
------ ----- -----              ----------        ----------            ----
*    1 65    C9300-48U          16.12.08          CAT9K_IOSXE           INSTALL


Configuration register is 0x102
En este ejemplo se puede ver, además, que no hay “Current Boot Variable”. Esto se refleja en la running-config, donde tampoco hay una línea con el comando boot system.
Switch#show running-config | include boot system
Switch#
<El comando no devuelve ninguna línea>
En install mode, esta línea no es necesaria. El switch siempre tendrá BOOT=packages.conf si usamos los comandos de install mode en cada proceso de upgrade, y esta variable se guarda en la ROM. Se puede verificar con el comando show romvar (solo disponible a partir de IOS-XE 16.12). Dependiendo de los distintos procesos de upgrade por los que haya pasado un switch hará presencia o no el comando boot system en la running-config.
Switch#show romvar
ROMMON variables:
 <Líneas omitidas>
 LICENSE_BOOT_LEVEL="network-advantage+dna-advantage,all:C9300_48P;"
 BAUD="9600"
 BOOT="flash:packages.conf;;"
 DC_COPY="yes"
 ABNORMAL_RESET_COUNT="0"
 SWITCH_IGNORE_STARTUP_CFG="0"
 <Líneas omitidas>
Se puede analizar el contenido del archivo packages.conf. Este archivo contiene básicamente un listado de archivos .pkg que deben cargarse en memoria. Las siguientes son las líneas del archivo presente en la flash del switch que estamos usando de ejemplo.
Switch#more flash:packages.conf
#! /usr/binos/bin/packages_conf.sh

sha1sum: ab2c00af9c9cbf807e1da9e2fd686a70e29254b6

# sha1sum above - used to verify that this file is not corrupted.

#
# package.conf: provisioned software file for build 2022-09-15_09.14
#

# NOTE: Editing this file by hand is not recommended. It is generated
#       as part of the build process, and is subject to boot-time
#       consistency checks. Automatically-produced package files are
#       guaranteed to pass those checks. Manually-maintained ones are
#       not. Because "nfs" and "mount" directives are processed first,
#       regardless of their position in the file, the recommended
#       approach is to keep a separate file containing JUST your
#       personal "nfs" and "mount" directives, and to append it to the
#       automatically-generated file.
#
#     Note further that when SHA-1 checksum verification is enabled,
#     you will NOT be able to alter this file without updating the
#     SHA-1 sum.

#
# This file can contain three types of entries:
#

#
# NFS directives (optional)
#     notes:    NFS directives are processed before all others (mount, iso).
#               Multiple NFS directives may appear so long as they do not
#               conflict -- that is, specify the same source or mountpoint.
#     syntax:   nfs <IP ADDRESS>:<REMOTE_PATH> <LOCAL_MOUNTPOINT>
#     example:  nfs 127.0.0.1:/auto/some/nfs/path /auto/some/nfs/path
#

#
# mount directives (optional)
#     notes:    mount directives are processed after 'nfs' and before 'iso'.
#               One mount directive may appear for each F/S/B/P tuple
#     syntax:   mount FRU SLOT BAY   PACKAGE_NAME   LINUX_PATH
#     example:  mount rp 0 0 rp_base /auto/some/nfs/path/abs_soft/rp_base.ppc
#
#               The specified LINUX_PATH may be local [sata disk] or
#               reference the NFS mounts since they are processed first.
#
#               Mount directives cause the package-specific mount link to
#               be set to the specified path instead of to the mountpoint
#               in sw for the corresponding ISO.
#

#
# iso directives (mandatory)
#     notes:    iso directives are processed last: any package for which
#               a 'mount' directive does not appear will be mounted.
#               One iso directive may appear for each F/S/B/P tuple.
#     syntax:   iso FRU SLOT BAY   PACKAGE_NAME  PACKAGE_FILE.bin
#     example:  iso rp 0 0 rp_base rp_base.ppc.bin
#
#               PACKAGE_FILE.bin is a path relative to the packages.conf
#               file.  Although it supports sub-directories for development
#               purposes, in deployment the files will always be managed
#               as in the same directory as packages.conf so as to
#               guarantee that name collisions cannot occur.
#
# Note that the RP 0/1 distinction is a convenience for development
# and testing as it allows us to have a packages.conf describe a
# SW load that varies depending on whether the RP finds itself in
# slot 0 or 1.
#
# The ISSU process *must* update *both* RP slots simultaneously so that
# the RP will behave predictably whichever slot it finds itself on [e.g.,
# if package X is upgraded, and the RP is ejected and put into either
# slot of a new chassis, we expect to see the upgraded X without regard
# to slot].
#

# This is for CAT9k
boot  rp 0 0   rp_boot         cat9k-rpboot.16.12.08.SPA.pkg
iso   rp 0 0   rp_base         cat9k-rpbase.16.12.08.SPA.pkg
iso   rp 0 0   rp_daemons      cat9k-rpbase.16.12.08.SPA.pkg
iso   rp 0 0   rp_iosd         cat9k-rpbase.16.12.08.SPA.pkg
iso   rp 0 0   rp_security     cat9k-rpbase.16.12.08.SPA.pkg
iso   rp 0 0   rp_wlc          cat9k-wlc.16.12.08.SPA.pkg
iso   rp 0 0   rp_webui        cat9k-webui.16.12.08.SPA.pkg
iso   rp 0 0   srdriver        cat9k-srdriver.16.12.08.SPA.pkg
iso   rp 0 0   guestshell      cat9k-guestshell.16.12.08.SPA.pkg

boot  rp 1 0   rp_boot         cat9k-rpboot.16.12.08.SPA.pkg
iso   rp 1 0   rp_base         cat9k-rpbase.16.12.08.SPA.pkg
iso   rp 1 0   rp_daemons      cat9k-rpbase.16.12.08.SPA.pkg
iso   rp 1 0   rp_iosd         cat9k-rpbase.16.12.08.SPA.pkg
iso   rp 1 0   rp_security     cat9k-rpbase.16.12.08.SPA.pkg
iso   rp 1 0   rp_wlc          cat9k-wlc.16.12.08.SPA.pkg
iso   rp 1 0   rp_webui        cat9k-webui.16.12.08.SPA.pkg
iso   rp 1 0   srdriver        cat9k-srdriver.16.12.08.SPA.pkg
iso   rp 1 0   guestshell      cat9k-guestshell.16.12.08.SPA.pkg

iso   fp 0 0   fp              cat9k-espbase.16.12.08.SPA.pkg
iso   fp 1 0   fp              cat9k-espbase.16.12.08.SPA.pkg

iso   cc 0 0   cc              cat9k-sipbase.16.12.08.SPA.pkg
iso   cc 1 0   cc              cat9k-sipbase.16.12.08.SPA.pkg
iso   cc 2 0   cc              cat9k-sipbase.16.12.08.SPA.pkg
iso   cc 3 0   cc              cat9k-sipbase.16.12.08.SPA.pkg
iso   cc 4 0   cc              cat9k-sipbase.16.12.08.SPA.pkg
iso   cc 5 0   cc              cat9k-sipbase.16.12.08.SPA.pkg
iso   cc 6 0   cc              cat9k-sipbase.16.12.08.SPA.pkg
iso   cc 7 0   cc              cat9k-sipbase.16.12.08.SPA.pkg
iso   cc 8 0   cc              cat9k-sipbase.16.12.08.SPA.pkg
iso   cc 9 0   cc              cat9k-sipbase.16.12.08.SPA.pkg
iso   cc 10 0  cc              cat9k-sipbase.16.12.08.SPA.pkg

iso   cc 0 0   cc_spa          cat9k-sipspa.16.12.08.SPA.pkg
iso   cc 1 0   cc_spa          cat9k-sipspa.16.12.08.SPA.pkg
iso   cc 2 0   cc_spa          cat9k-sipspa.16.12.08.SPA.pkg
iso   cc 3 0   cc_spa          cat9k-sipspa.16.12.08.SPA.pkg
iso   cc 4 0   cc_spa          cat9k-sipspa.16.12.08.SPA.pkg
iso   cc 5 0   cc_spa          cat9k-sipspa.16.12.08.SPA.pkg
iso   cc 6 0   cc_spa          cat9k-sipspa.16.12.08.SPA.pkg
iso   cc 7 0   cc_spa          cat9k-sipspa.16.12.08.SPA.pkg
iso   cc 8 0   cc_spa          cat9k-sipspa.16.12.08.SPA.pkg
iso   cc 9 0   cc_spa          cat9k-sipspa.16.12.08.SPA.pkg
iso   cc 10 0  cc_spa          cat9k-sipspa.16.12.08.SPA.pkg

iso   cc 0  0  cc_srdriver     cat9k-cc_srdriver.16.12.08.SPA.pkg
iso   cc 1  0  cc_srdriver     cat9k-cc_srdriver.16.12.08.SPA.pkg
iso   cc 2  0  cc_srdriver     cat9k-cc_srdriver.16.12.08.SPA.pkg
iso   cc 3  0  cc_srdriver     cat9k-cc_srdriver.16.12.08.SPA.pkg
iso   cc 4  0  cc_srdriver     cat9k-cc_srdriver.16.12.08.SPA.pkg
iso   cc 5  0  cc_srdriver     cat9k-cc_srdriver.16.12.08.SPA.pkg
iso   cc 6  0  cc_srdriver     cat9k-cc_srdriver.16.12.08.SPA.pkg
iso   cc 7  0  cc_srdriver     cat9k-cc_srdriver.16.12.08.SPA.pkg
iso   cc 8  0  cc_srdriver     cat9k-cc_srdriver.16.12.08.SPA.pkg
iso   cc 9  0  cc_srdriver     cat9k-cc_srdriver.16.12.08.SPA.pkg
iso   cc 10 0  cc_srdriver     cat9k-cc_srdriver.16.12.08.SPA.pkg

#
# -start- superpackage .pkginfo
#
# pkginfo: Name: rp_super
# pkginfo: BuildTime: 2022-09-15_09.14
# pkginfo: ReleaseDate: Thu-15-Sep-22-04:50
# pkginfo: .BuildArch: x86_64
# pkginfo: BootArchitecture: i686
# pkginfo: .BootArch: i686
# pkginfo: RouteProcessor: cat9k
# pkginfo: Platform: CAT9K
# pkginfo: User: mcpre
# pkginfo: PackageName: universalk9
# pkginfo: Build: 16.12.08
# pkginfo: .SupportedBoards: cat9k
# pkginfo: .InstallModel:
# pkginfo: .PackageRole: rp_super
# pkginfo: .RestartRole: rp_super
# pkginfo: .UnifiedPlatformList: passport,nyquist,starfleet
# pkginfo: CardTypes:
# pkginfo: .CardTypes:
# pkginfo: .BuildPath: /nobackup/mcpre/release/BLD-V16_12_08_FC1/binos/linkfarm/stage-cat9k/hard/rp_super_universalk9.x86_64
# pkginfo: .Version: 16.12.08.0.7211.1663258461..Gibraltar
# pkginfo: .InstallVersion: 1.0.0
# pkginfo: .InstallCapCommitSupport: yes
#
# -end- superpackage .pkginfo
#
Obviamente, todos estos archivos .pkg deben estar en la memoria flash del equipo para que el proceso de carga de la imagen de software sea exitosa.
Switch#show flash: | include \.pkg
 78   20022284 Oct 31 2022 23:50:01.0000000000 +00:00 cat9k-cc_srdriver.16.12.08.SPA.pkg
 79   89015304 Oct 31 2022 23:50:01.0000000000 +00:00 cat9k-espbase.16.12.08.SPA.pkg
 80    1684488 Oct 31 2022 23:50:01.0000000000 +00:00 cat9k-guestshell.16.12.08.SPA.pkg
 81  537015300 Oct 31 2022 23:50:01.0000000000 +00:00 cat9k-rpbase.16.12.08.SPA.pkg
 82   41774547 Oct 31 2022 23:50:27.0000000000 +00:00 cat9k-rpboot.16.12.08.SPA.pkg
 83   31294472 Oct 31 2022 23:50:01.0000000000 +00:00 cat9k-sipbase.16.12.08.SPA.pkg
 84   60204036 Oct 31 2022 23:50:02.0000000000 +00:00 cat9k-sipspa.16.12.08.SPA.pkg
 85   30827528 Oct 31 2022 23:50:02.0000000000 +00:00 cat9k-srdriver.16.12.08.SPA.pkg
 86   12923908 Oct 31 2022 23:50:02.0000000000 +00:00 cat9k-webui.16.12.08.SPA.pkg
 87       9220 Oct 31 2022 23:50:02.0000000000 +00:00 cat9k-wlc.16.12.08.SPA.pkg
Lo más importante de install mode son los cambios que introduce a la hora de hacer actualizaciones de software en los equipos. Esto se explorará en más detalle en la sección correspondiente.
Actualización de software
A continuación, se explica el método de actualización de software para bundle mode y para install mode.
Nota: antes de realizar cualquier actualización de software, es recomendable leer las Release Notes de la versión de IOS-XE de destino y comprobar si no hay cambios o limitaciones en el proceso de actualización.
Actualización en Bundle mode
La actualización en bundle mode es sencilla, pero también menos flexible. El proceso paso a paso es el siguiente:
- Copiar la imagen .bin descargada desde Cisco al equipo que se desear actualizar. La copia puede ser desde la red (TFTP, FTP, SCP, HTTP) o local con un dispositivo USB. En este ejemplo, se descarga por FTP.
Switch#copy ftp://<username>:<password>@<server-ip>/cat9k_iosxe.17.06.03.SPA.bin flash:
Destination filename [cat9k_iosxe.17.06.03.SPA.bin]?
Accessing ftp://*:*@<server-ip>/cat9k_iosxe.17.06.03.SPA.bin...!!!!!!!!!!!!!!!!!!!!!!!!!!!!!!!!!!!!!!!!!!!!!!!!!!!!!!!!!!!!!!!!!!!!!!!!!!!!!!!!!!!!!!!!!!!!!!!!!!!!!!!!!!!!!!!!!!!!!!!!!!!!!!!!!!!!!!!!!!!!!!!!!!!!!!!!!!!!!!<Omitido>!!!!!!!!!
[OK - 1017259730/4096 bytes]- Chequear la integridad de la imagen comparando el hash MD5 con el provisto por Cisco.
Switch#verify /md5 flash:cat9k_iosxe.17.06.03.SPA.bin 4637c5c6767fee76c8b0cec1b7370cd3
..........................................................................................
..........................................................................................
..........................................................................................
..........................................................................................
................................<Omitido>............................................Done!
Verified (flash:cat9k_iosxe.17.06.03.SPA.bin) = 4637c5c6767fee76c8b0cec1b7370cd3- Usar el comando
boot systemen el modo de configuración global para apuntar a la nueva imagen.
Switch#configure terminal
Switch(config)#boot system flash:cat9k_iosxe.17.06.03.SPA.bin- Eliminar el comando
boot systemque apunta a la imagen anterior (la que se está ejecutando actualmente).
Switch(config)#no boot system flash:cat9k_iosxe.16.12.08.SPA.bin- Verificar el comando
boot systemen larunning-configy guardar la configuración.
Switch#show running-config | include boot system
boot system switch all flash:cat9k_iosxe.17.06.03.SPA.bin
Switch#write
Building configuration...
[OK]- Reiniciar el equipo. Una vez hecho esto debería estar ejecutando la nueva versión de IOS-XE.
Habiendo realizado estos pasos, el equipo ya está actualizado. Se puede eliminar de la memoria flash el archivo .bin de la versión anterior si se necesita liberar espacio.
Actualización en Install mode
Para install mode, en IOS-XE 16 se introdujo el comando install que será el que usemos para el proceso de upgrade. Al usar install mode se ganan algunas funcionalidades que no están presentes en bundle mode:
- En el caso de estar actualizando un stack, la nueva imagen se sincronizará en todos los miembros del mismo de forma automática.
- Soporta rollback en caso de que el equipo pierda gestión remota luego de la actualización.
- Permite limpiar la memoria flash de archivos innecesarios de manera segura.
El proceso de actualización consiste en tres pasos principales:
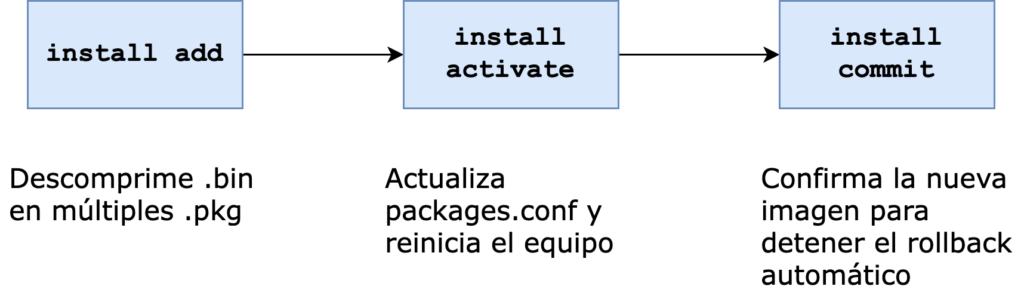
- Install add: Descomprime la imagen .bin para obtener los múltiples .pkg.
- Install activate: Reescribe packages.conf con la información correspondiente a la nueva imagen y reinicia el equipo.
- Install commit: Una vez que el equipo está ejecutando la nueva versión de software, se desactiva el rollback automático confirmando la nueva imagen.
Estos pasos pueden realizarse de forma independiente, o todos en un mismo comando. Al usar la última alternativa se pierde la función de rollback pero el proceso es más parecido al de bundle mode, lo que permite adaptar scripts un poco más fácilmente. En este ejemplo se utilizarán los comandos independientes.
Los pasos a seguir para una actualización en este modo de operación son:
- Copiar la imagen .bin descargada desde Cisco al equipo que se desear actualizar. La copia puede ser desde la red (TFTP, FTP, SCP, HTTP) o local con un dispositivo USB. En este ejemplo, se descarga por FTP.
Switch#copy ftp://<username>:<password>@<server-ip>/cat9k_iosxe.17.06.03.SPA.bin flash:
Destination filename [cat9k_iosxe.17.06.03.SPA.bin]?
Accessing ftp://*:*@<server-ip>/cat9k_iosxe.17.06.03.SPA.bin...!!!!!!!!!!!!!!!!!!!!!!!!!!!!!!!!!!!!!!!!!!!!!!!!!!!!!!!!!!!!!!!!!!!!!!!!!!!!!!!!!!!!!!!!!!!!!!!!!!!!!!!!!!!!!!!!!!!!!!!!!!!!!!!!!!!!!!!!!!!!!!!!!!!!!!!!!!!!!!<Omitido>!!!!!!!!!
[OK - 1017259730/4096 bytes]- Chequear la integridad de la imagen comparando el hash MD5 con el provisto por Cisco.
Switch#verify /md5 flash:cat9k_iosxe.17.06.03.SPA.bin 4637c5c6767fee76c8b0cec1b7370cd3
..........................................................................................
..........................................................................................
..........................................................................................
..........................................................................................
................................<Omitido>............................................Done!
Verified (flash:cat9k_iosxe.17.06.03.SPA.bin) = 4637c5c6767fee76c8b0cec1b7370cd3- Ejecutar el comando
install addindicando el archivo .bin para agregar la nueva imagen al equipo. Podemos ver luego el comandoshow install summarypara verificar que esta nueva imagen fue agregada.
La nueva imagen está inactiva, se necesita activarla manualmente para que el equipo comience a utilizarla.
Switch#install add file flash:cat9k_iosxe.17.06.03.SPA.bin
install_add: START Tue Nov  1 18:04:24 UTC 2022
install_add: Adding PACKAGE
install_add: Checking whether new add is allowed ....

--- Starting initial file syncing ---
Info: Finished copying flash:cat9k_iosxe.17.06.03.SPA.bin to the selected switch(es)
Finished initial file syncing

--- Starting Add ---
Performing Add on all members
  [1] Add package(s) on switch 1
  [1] Finished Add on switch 1
Checking status of Add on [1]
Add: Passed on [1]
Finished Add

Image added. Version: 17.06.03.0.3629
SUCCESS: install_add  Tue Nov  1 18:07:14 UTC 2022
Switch#show install summary
[ Switch 1 ] Installed Package(s) Information:
State (St): I - Inactive, U - Activated & Uncommitted,
            C - Activated & Committed, D - Deactivated & Uncommitted
--------------------------------------------------------------------------------
Type  St   Filename/Version
--------------------------------------------------------------------------------
IMG   I    17.06.03.0.3629
IMG   C    16.12.08.0.7211

--------------------------------------------------------------------------------
Auto abort timer: inactive
--------------------------------------------------------------------------------- Activar la imagen mediante el comando
install activate. Esto va a reiniciar el equipo al terminar.
Nota: Si se quiere hacer mediante scripting, es importante agregarprompt-level noneal final del comando anterior para evitar tener que aceptar la activación de forma interactiva.
Switch#install activate
install_activate: START Tue Nov  1 18:38:57 UTC 2022
install_activate: Activating PACKAGE
Following packages shall be activated:
/flash/cat9k-wlc.17.06.03.SPA.pkg
/flash/cat9k-webui.17.06.03.SPA.pkg
/flash/cat9k-srdriver.17.06.03.SPA.pkg
/flash/cat9k-sipspa.17.06.03.SPA.pkg
/flash/cat9k-sipbase.17.06.03.SPA.pkg
/flash/cat9k-rpboot.17.06.03.SPA.pkg
/flash/cat9k-rpbase.17.06.03.SPA.pkg
/flash/cat9k-lni.17.06.03.SPA.pkg
/flash/cat9k-guestshell.17.06.03.SPA.pkg
/flash/cat9k-espbase.17.06.03.SPA.pkg
/flash/cat9k-cc_srdriver.17.06.03.SPA.pkg

This operation may require a reload of the system. Do you want to proceed? [y/n]y
--- Starting Activate ---
Performing Activate on all members
  [1] Activate package(s) on switch 1
    --- Starting list of software package changes ---
    Old files list:
      Removed cat9k-cc_srdriver.16.12.08.SPA.pkg
      Removed cat9k-espbase.16.12.08.SPA.pkg
      Removed cat9k-guestshell.16.12.08.SPA.pkg
      Removed cat9k-rpbase.16.12.08.SPA.pkg
      Removed cat9k-rpboot.16.12.08.SPA.pkg
      Removed cat9k-sipbase.16.12.08.SPA.pkg
      Removed cat9k-sipspa.16.12.08.SPA.pkg
      Removed cat9k-srdriver.16.12.08.SPA.pkg
      Removed cat9k-webui.16.12.08.SPA.pkg
      Removed cat9k-wlc.16.12.08.SPA.pkg
    New files list:
      Added cat9k-cc_srdriver.17.06.03.SPA.pkg
      Added cat9k-espbase.17.06.03.SPA.pkg
      Added cat9k-guestshell.17.06.03.SPA.pkg
      Added cat9k-lni.17.06.03.SPA.pkg
      Added cat9k-rpbase.17.06.03.SPA.pkg
      Added cat9k-rpboot.17.06.03.SPA.pkg
      Added cat9k-sipbase.17.06.03.SPA.pkg
      Added cat9k-sipspa.17.06.03.SPA.pkg
      Added cat9k-srdriver.17.06.03.SPA.pkg
      Added cat9k-webui.17.06.03.SPA.pkg
      Added cat9k-wlc.17.06.03.SPA.pkg
    Finished list of software package changes
  [1] Finished Activate on switch 1
Checking status of Activate on [1]
Activate: Passed on [1]
Finished Activate

[1]: Performing Upgrade_Service
300+0 records in
300+0 records out
307200 bytes (307 kB, 300 KiB) copied, 0.31935 s, 962 kB/s
16128+0 records in
16128+0 records out
8257536 bytes (8.3 MB, 7.9 MiB) copied, 8.58064 s, 962 kB/s
  SUCCESS: Upgrade_Service finished
Install will reload the system now!
SUCCESS: install_activate Tue Nov 1 18:52:42 UTC 2022- Una vez que el equipo se haya reiniciado, comprobar la imagen que está corriendo ahora con el comando
show install summary. La imagen de IOS-XE actual aparece como uncommitted. El paso siguiente es usar el comandoinstall commitpara que la imagen quede activada de forma permanente.
Nota: por defecto el proceso activa un timer de 120 minutos luego de la activación de una nueva imagen de software. De no hacer commit dentro de ese tiempo se activará el proceso de rollback automático. El switch luego volverá a su imagen de IOS-XE previa y el proceso deberá repetirse desde el paso 1.
Switch#show install summary
[ Switch 1 ] Installed Package(s) Information:
State (St): I - Inactive, U - Activated & Uncommitted,
            C - Activated & Committed, D - Deactivated & Uncommitted
--------------------------------------------------------------------------------
Type  St   Filename/Version
--------------------------------------------------------------------------------
IMG   U    17.06.03.0.3629

--------------------------------------------------------------------------------
Auto abort timer: active , time before rollback - 01:39:37
--------------------------------------------------------------------------------


Switch#install commit
install_commit: START Tue Nov  1 23:08:34 UTC 2022
install_commit: Committing PACKAGE

--- Starting Commit ---
Performing Commit on all members
  [1] Commit package(s) on switch 1
  [1] Finished Commit on switch 1
Checking status of Commit on [1]
Commit: Passed on [1]
Finished Commit

SUCCESS: install_commit  Tue Nov  1 23:08:37 UTC 2022
Switch#show install summary
[ Switch 1 ] Installed Package(s) Information:
State (St): I - Inactive, U - Activated & Uncommitted,
            C - Activated & Committed, D - Deactivated & Uncommitted
--------------------------------------------------------------------------------
Type  St   Filename/Version
--------------------------------------------------------------------------------
IMG   C    17.06.03.0.3629

--------------------------------------------------------------------------------
Auto abort timer: inactive
--------------------------------------------------------------------------------- Ejecutar una limpieza de los paquetes que ya no se usan (de la imagen anterior) para liberar espacio en la memoria flash. Se usa el comando
install remove inactivepara esto. De esta forma solo se estarán eliminando archivos no necesarios para la ejecución de la imagen de software nueva.
Nota: a modo solamente de comentario, este proceso también elimina el archivo .bin de la imagen nueva. Esto es porque, una vez descomprimido, ya no es necesario.
Switch#install remove inactive
install_remove: START Tue Nov  1 23:11:07 UTC 2022
Cleaning up unnecessary package files
No path specified, will use booted path flash:packages.conf
Cleaning flash:
  Scanning boot directory for packages ... done.
  Preparing packages list to delete ...
    cat9k-cc_srdriver.17.06.03.SPA.pkg
      File is in use, will not delete.
    cat9k-espbase.17.06.03.SPA.pkg
      File is in use, will not delete.
    cat9k-guestshell.17.06.03.SPA.pkg
      File is in use, will not delete.
    cat9k-lni.17.06.03.SPA.pkg
      File is in use, will not delete.
    cat9k-rpbase.17.06.03.SPA.pkg
      File is in use, will not delete.
    cat9k-rpboot.17.06.03.SPA.pkg
      File is in use, will not delete.
    cat9k-sipbase.17.06.03.SPA.pkg
      File is in use, will not delete.
    cat9k-sipspa.17.06.03.SPA.pkg
      File is in use, will not delete.
    cat9k-srdriver.17.06.03.SPA.pkg
      File is in use, will not delete.
    cat9k-webui.17.06.03.SPA.pkg
      File is in use, will not delete.
    cat9k-wlc.17.06.03.SPA.pkg
      File is in use, will not delete.
    packages.conf
      File is in use, will not delete.
  done.

The following files will be deleted:
[switch 1]:
/flash/cat9k-cc_srdriver.16.12.08.SPA.pkg
/flash/cat9k-espbase.16.12.08.SPA.pkg
/flash/cat9k-guestshell.16.12.08.SPA.pkg
/flash/cat9k-rpbase.16.12.08.SPA.pkg
/flash/cat9k-rpboot.16.12.08.SPA.pkg
/flash/cat9k-sipbase.16.12.08.SPA.pkg
/flash/cat9k-sipspa.16.12.08.SPA.pkg
/flash/cat9k-srdriver.16.12.08.SPA.pkg
/flash/cat9k-webui.16.12.08.SPA.pkg
/flash/cat9k-wlc.16.12.08.SPA.pkg
/flash/cat9k_iosxe.17.06.03.SPA.1.conf
/flash/cat9k_iosxe.17.06.03.SPA.bin
/flash/cat9k_iosxe.17.06.03.SPA.conf

Do you want to remove the above files? [y/n]y
[switch 1]:
Deleting file flash:cat9k-cc_srdriver.16.12.08.SPA.pkg ... done.
Deleting file flash:cat9k-espbase.16.12.08.SPA.pkg ... done.
Deleting file flash:cat9k-guestshell.16.12.08.SPA.pkg ... done.
Deleting file flash:cat9k-rpbase.16.12.08.SPA.pkg ... done.
Deleting file flash:cat9k-rpboot.16.12.08.SPA.pkg ... done.
Deleting file flash:cat9k-sipbase.16.12.08.SPA.pkg ... done.
Deleting file flash:cat9k-sipspa.16.12.08.SPA.pkg ... done.
Deleting file flash:cat9k-srdriver.16.12.08.SPA.pkg ... done.
Deleting file flash:cat9k-webui.16.12.08.SPA.pkg ... done.
Deleting file flash:cat9k-wlc.16.12.08.SPA.pkg ... done.
Deleting file flash:cat9k_iosxe.17.06.03.SPA.1.conf ... done.
Deleting file flash:cat9k_iosxe.17.06.03.SPA.bin ... done.
Deleting file flash:cat9k_iosxe.17.06.03.SPA.conf ... done.
SUCCESS: Files deleted.
--- Starting Post_Remove_Cleanup ---
Performing Post_Remove_Cleanup on all members
  [1] Post_Remove_Cleanup package(s) on switch 1
  [1] Finished Post_Remove_Cleanup on switch 1
Checking status of Post_Remove_Cleanup on [1]
Post_Remove_Cleanup: Passed on [1]
Finished Post_Remove_Cleanup

SUCCESS: install_remove  Tue Nov  1 23:16:39 UTC 2022
Con estos pasos se realiza una actualización en install mode. Este modo de operación también permite una actualización en un único paso, como ya se comentó.
El comando install se encuentra disponible mediante modelos YANG a partir de las versiones de IOS-XE superiores a 17.3. Para saber más al respecto de las mismas, se puede revisar la entrada “RESTCONF: Operaciones” de este mismo blog.
Cambio entre modos
La última sección de este post explica cómo realizar un cambio entre modos de operación. Ambos procesos son simples, pero requieren reinicio de los switches afectados.
De Bundle mode a Install mode
Para realizar un cambio a install mode en un equipo que está actualmente en bundle mode el proceso es exactamente igual al de una actualización de software en install mode de único paso. Los pasos a seguir son:
- Como se puede utilizar el archivo .bin que el equipo está actualmente corriendo (no es necesario hacer un upgrade de software), se usa el comando
installcon este archivo. El switch se reinicia como consecuencia de este proceso.
Switch#install add file flash:cat9k_iosxe.17.06.03.SPA.bin activate commit
install_add_activate_commit: START Wed Nov  2 23:15:09 UTC 2022
install_add_activate_commit: Adding PACKAGE
install_add_activate_commit: Checking whether new add is allowed ....

--- Starting initial file syncing ---
Info: Finished copying flash:cat9k_iosxe.17.06.03.SPA.bin to the selected switch(es)
Finished initial file syncing

--- Starting Add ---
Performing Add on all members
  [1] Add package(s) on switch 1
  [1] Finished Add on switch 1
Checking status of Add on [1]
Add: Passed on [1]
Finished Add

Image added. Version: 17.06.03.0.3629
install_add_activate_commit: Activating PACKAGE
Following packages shall be activated:
/flash/cat9k-wlc.17.06.03.SPA.pkg
/flash/cat9k-webui.17.06.03.SPA.pkg
/flash/cat9k-srdriver.17.06.03.SPA.pkg
/flash/cat9k-sipspa.17.06.03.SPA.pkg
/flash/cat9k-sipbase.17.06.03.SPA.pkg
/flash/cat9k-rpboot.17.06.03.SPA.pkg
/flash/cat9k-rpbase.17.06.03.SPA.pkg
/flash/cat9k-lni.17.06.03.SPA.pkg
/flash/cat9k-guestshell.17.06.03.SPA.pkg
/flash/cat9k-espbase.17.06.03.SPA.pkg
/flash/cat9k-cc_srdriver.17.06.03.SPA.pkg

This operation may require a reload of the system. Do you want to proceed? [y/n]y
--- Starting Activate ---
Performing Activate on all members
  [1] Activate package(s) on switch 1
  [1] Finished Activate on switch 1
Checking status of Activate on [1]
Activate: Passed on [1]
Finished Activate

--- Starting Commit ---
Performing Commit on all members
  [1] Commit package(s) on switch 1
  [1] Finished Commit on switch 1
Checking status of Commit on [1]
Commit: Passed on [1]
Finished Commit

Send model notification for install_add_activate_commit before reload
[1]: Performing Upgrade_Service
300+0 records in
300+0 records out
307200 bytes (307 kB, 300 KiB) copied, 0.195346 s, 1.6 MB/s
mount: /tmp/microcode_update/boot_pkg: WARNING: device write-protected, mounted read-only.
  SUCCESS: Upgrade_Service finished
Install will reload the system now!
SUCCESS: install_add_activate_commit Wed Nov 2 23:25:33 UTC 2022- Verificar el modo de operación del switch una vez completado el proceso.
Switch#show boot
---------------------------
Switch 1
---------------------------
Current Boot Variables:
BOOT variable = flash:packages.conf;

Boot Variables on next reload:
BOOT variable = flash:packages.conf;
Manual Boot = no
Enable Break = no
Boot Mode = DEVICE
iPXE Timeout = 0
Switch#show version | begin Mode
Switch Ports Model              SW Version        SW Image              Mode
------ ----- -----              ----------        ----------            ----
* 1 65 C9300-48U 17.06.03 CAT9K_IOSXE INSTALL- Hacer una limpieza de la memoria flash mediante el comando
install remove inactive.
Switch#install remove inactive
install_remove: START Wed Nov  2 23:40:02 UTC 2022
Cleaning up unnecessary package files
No path specified, will use booted path flash:packages.conf
Cleaning flash:
  Scanning boot directory for packages ... done.
  Preparing packages list to delete ...
    cat9k-cc_srdriver.17.06.03.SPA.pkg
      File is in use, will not delete.
    cat9k-espbase.17.06.03.SPA.pkg
      File is in use, will not delete.
    cat9k-guestshell.17.06.03.SPA.pkg
      File is in use, will not delete.
    cat9k-lni.17.06.03.SPA.pkg
      File is in use, will not delete.
    cat9k-rpbase.17.06.03.SPA.pkg
      File is in use, will not delete.
    cat9k-rpboot.17.06.03.SPA.pkg
      File is in use, will not delete.
    cat9k-sipbase.17.06.03.SPA.pkg
      File is in use, will not delete.
    cat9k-sipspa.17.06.03.SPA.pkg
      File is in use, will not delete.
    cat9k-srdriver.17.06.03.SPA.pkg
      File is in use, will not delete.
    cat9k-webui.17.06.03.SPA.pkg
      File is in use, will not delete.
    cat9k-wlc.17.06.03.SPA.pkg
      File is in use, will not delete.
    packages.conf
      File is in use, will not delete.
  done.

The following files will be deleted:
[switch 1]:
/flash/cat9k_iosxe.17.06.03.SPA.bin

Do you want to remove the above files? [y/n]y
[switch 1]:
Deleting file flash:cat9k_iosxe.17.06.03.SPA.bin ... done.
SUCCESS: Files deleted.
--- Starting Post_Remove_Cleanup ---
Performing Post_Remove_Cleanup on all members
  [1] Post_Remove_Cleanup package(s) on switch 1
  [1] Finished Post_Remove_Cleanup on switch 1
Checking status of Post_Remove_Cleanup on [1]
Post_Remove_Cleanup: Passed on [1]
Finished Post_Remove_Cleanup

SUCCESS: install_remove  Wed Nov  2 23:51:08 UTC 2022
Nota: Si se quisiera hacer una conversión con el comando install en tres pasos, se recibe el siguiente error al ejecutar install add, y no se puede avanzar.
Switch#install add file flash:cat9k_iosxe.17.06.03.SPA.bin
install_add: START Wed Nov  2 23:10:34 UTC 2022
install_add: Adding PACKAGE
install_add: Checking whether new add is allowed ....
ERROR: install_add: Booted in bundle mode. For Bundle-to-Install mode conversion, please use one-shot CLI - install add file <> activate commit
FAILED: install_add  exit(1) Wed Nov  2 23:11:29 UTC 2022
De Install mode a Bundle mode
Para realizar un cambio a bundle mode en un equipo que está actualmente en install mode el proceso es exactamente igual al de una actualización de software en bundle mode.
Nota: En este caso, si se hizo limpieza de la memoria flash, el archivo .bin de la imagen actual que ejecuta el equipo puede no estar disponible, habrá que cargarla nuevamente en el equipo.
Los pasos a seguir son:
- Copiar la imagen .bin descargada desde Cisco al equipo que se desear modificar. La copia puede ser desde la red (TFTP, FTP, SCP, HTTP) o local con un dispositivo USB. En este ejemplo, se descarga por FTP.
Switch#copy ftp://<username>:<password>@<server-ip>/cat9k_iosxe.17.06.03.SPA.bin flash:
Destination filename [cat9k_iosxe.17.06.03.SPA.bin]?
Accessing ftp://*:*@<server-ip>/cat9k_iosxe.17.06.03.SPA.bin...!!!!!!!!!!!!!!!!!!!!!!!!!!!!!!!!!!!!!!!!!!!!!!!!!!!!!!!!!!!!!!!!!!!!!!!!!!!!!!!!!!!!!!!!!!!!!!!!!!!!!!!!!!!!!!!!!!!!!!!!!!!!!!!!!!!!!!!!!!!!!!!!!!!!!!!!!!!!!!<Omitido>!!!!!!!!!
[OK - 1017259730/4096 bytes]- Chequear la integridad de la imagen comparando el hash MD5 con el provisto por Cisco.
Switch#verify /md5 flash:cat9k_iosxe.17.06.03.SPA.bin 4637c5c6767fee76c8b0cec1b7370cd3
..........................................................................................
..........................................................................................
..........................................................................................
..........................................................................................
................................<Omitido>............................................Done!
Verified (flash:cat9k_iosxe.17.06.03.SPA.bin) = 4637c5c6767fee76c8b0cec1b7370cd3- Eliminar cualquier comando
bootanterior.
Switch#conf t
Enter configuration commands, one per line.  End with CNTL/Z.
Switch(config)#no boot system- Agregar el nuevo comando
boot, esta vez apuntando al archivo .bin cargado en el punto 1. Luego, guardar la configuración.
Switch(config)#boot system flash:cat9k_iosxe.17.06.03.SPA.bin
Switch(config)#end
Switch#write
Building configuration...
[OK]- Realizar una verificación de la variable BOOT, y reiniciar el equipo.
Switch#show boot
---------------------------
Switch 1
---------------------------
Current Boot Variables:
BOOT variable = flash:cat9k_iosxe.17.06.03.SPA.bin;

Boot Variables on next reload:
BOOT variable = flash:cat9k_iosxe.17.06.03.SPA.bin;
Manual Boot = no
Enable Break = no
Boot Mode = DEVICE
iPXE Timeout = 0
Switch#reload
Reload command is being issued on Active unit, this will reload the whole stack
Proceed with reload? [confirm]- Verificar el modo de operación del switch una vez completado el proceso.
Switch#show version | begin Mode
Switch Ports Model              SW Version        SW Image              Mode
------ ----- -----              ----------        ----------            ----
*    1 65    C9300-48U          17.06.03          CAT9K_IOSXE           BUNDLE
Concluyen aquí los procedimientos que quería mostrar. Espero que este post haya sido de utilidad, los comentarios están abiertos para cualquier duda.
Gracias, gran aporte
Excelente aporte !!